The first question comes to your mind when you discover that your awesome Raspberry Pi or Kubernetes cluster you are using for home automation is not connected to the Internet is how to get any notification about such event?
The idea is to use Slack as the message delivery and notification mechanism since there is a mobile client available for iOS and Android and Slack also has good extensibility via bots and its API. So you can start a Slack bot on your Raspberry Pi or Kubernetes cluster and, assuming that your bot is using real-time messaging API from Slack, you can get an almost immediate update when it disconnects from Slack looking at the bot’s status indicator. Unfortunately Slack does not notify you when someone, either a person or a bot, goes online or offline. But you can create another bot for monitoring the first one and get a message every time the monitored bot changes its presence. The spy bot has to be hosted somewhere, and after comparing several options, I decided to host it on a Google Compute Engine virtual machine using free f1-micro (1 vCPU, 0.6 GB memory) instance.
The full setup is depicted in the diagram below:
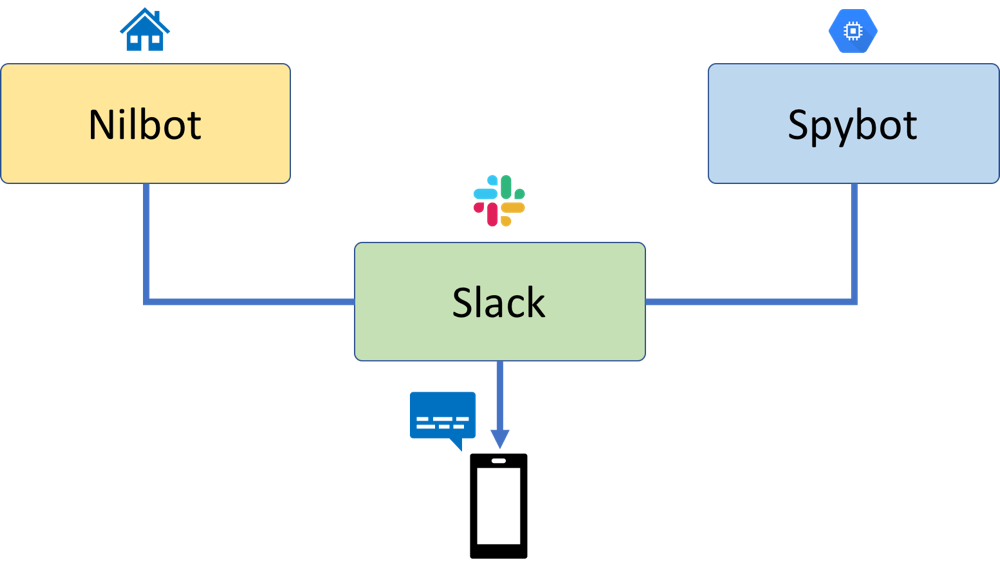
- Nilbot is running on your home Raspberry Pi, Kubernetes cluster, or whatever you run at home. It maintains a constant connection with Slack using real-time API over WebSockets. It doesn’t need to be Nilbot, you can install a Slack bot which allows you to execute cubectl or helm commands and operate your cluster, or any other Slack bot with the real-time API support.
-
Spybot is running on an f1-micro VM provided by Google Compute Engine and constantly monitoring Nilbot’s presence.
-
You install Slack mobile application and by issuing spy-on @nilbot command, you start spying on Nilbot. When it disconnects from Slack you get a message from Spybot.
Step-by-step instruction
Provisioning Nilbot
First of all, you need to create a Slack account if you haven’t got it yet, then perform the following steps:
- Create an application by navigating to Your Apps and clicking Create New App button.
-
In the opened dialog you need to specify a name (e.g. Nilbot) and a Slack workspace.
-
By clicking Create App button, you will create Nilbot application and Slack will redirect you to the application settings page.
-
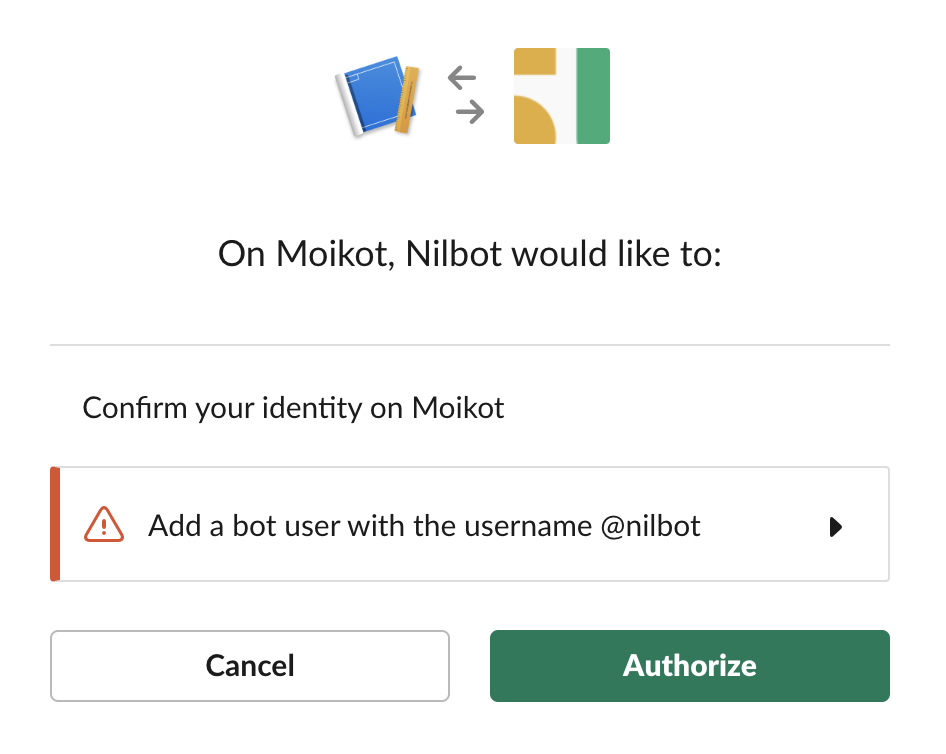
On the Nilbot application settings page, click Bot Users in the Features menu on the left side of the page and then click Add a Bot User button on the opened page.
-
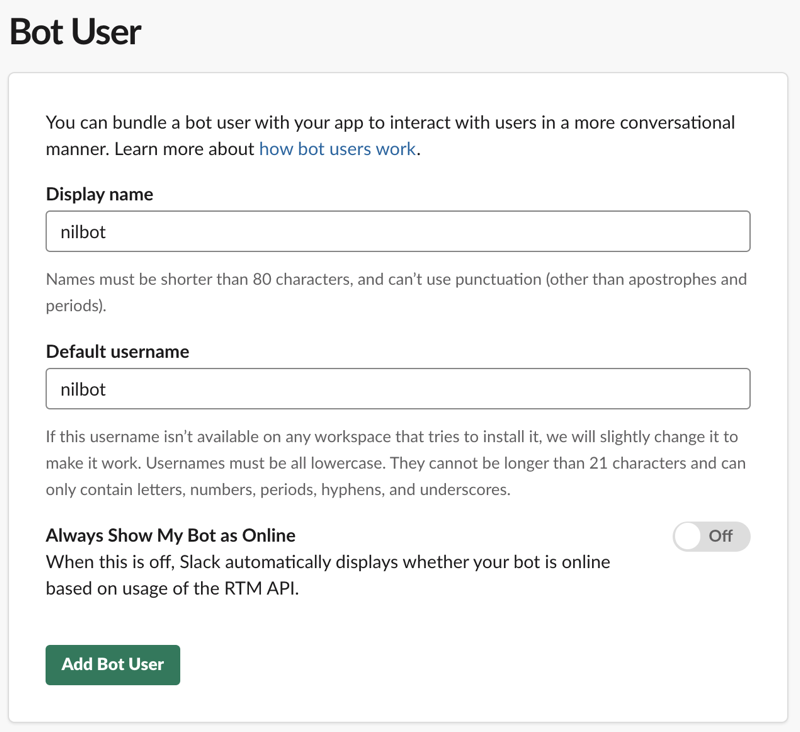
In the dialog opened specify a display name and a default user name. Leave Always Show My Bot as Online in Off position since the bot will be using Slack’s real-time API and its presence will be correctly reflected. Click Add Bot User button to complete the process.
- Now, if you open the OAuth & Permissions page and navigate to Scopes, you should see one permission scope added to your application – Add a bot user with the username @nilbot.
-
Staying on OAuth & Permissions, scroll up to OAuth Tokens & Redirect URLs section and click Install App to Workspace button. In the dialog opened authorize the application.
-
After authorizing the application, you will be redirected back to OAuth & Permissions page where you can obtain a token from Bot User OAuth Access Token field. This token will be used for accessing Slack API.
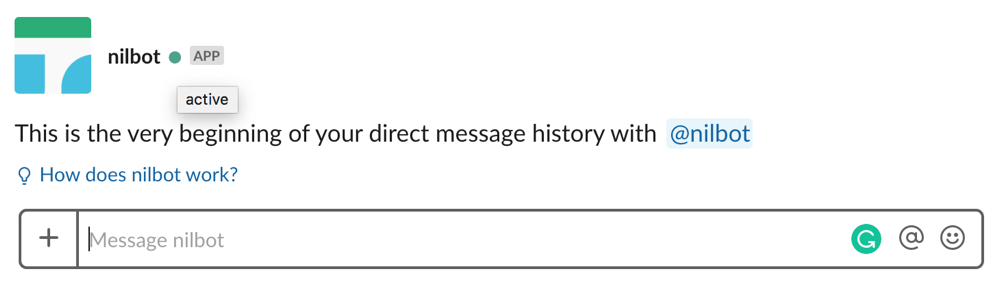
Now you are ready to start Nilbot. If you are running Docker on Raspberry Pi you can start it in a Docker container:
docker run -d --restart unless-stopped -e BOT_TOKEN=[bot user token] moikot/slack-nil-bot
If you are running Kubernetes with Helm installed you can install nil-bot in this way:
helm repo add moikot https://moikot.github.io/helm-charts
helm install moikot/slack-nil-bot --name=nil-bot --set token=[bot user key]
You should see bot’s status changes to “active”.
If you don’t mind constantly checking the presence status of Nilbot by yourself you can just stop here, otherwise, let’s continue and install Spybot for receiving automatic notifications.
Provisioning Spybot
Creating a Slack application for Spybot has no difference from creating an application for Nilbot. You need to perform the same steps and at the end obtain a token from Bot User OAuth Access Token field.
The main difference is that Spybot is hosted on a Google Compute Engine virtual machine and uses Google’s Firestore for persisting some data, so you have to have a Google account to perform the following steps.
- Assuming that you’ve got a Google account, a project (if not, please refer the documentation) and have access to the Google Cloud Console, next thing you need to do is to verify that your GCP project has Firebase associated with it. Open Firebase Console and check if there is a project associated with GCP project. If not, click Add project button and select the GCP project you want to use for hosting the bot from the dropdown list. Follow the necessary steps and create a Firebase project associated with the GCP project.
- To host Spybot you need to create a virtual machine instance. Open Compute Engine/VM instances page and click Create Instance button.
- In the dialog opened, specify your instance name and, most importantly, select machine type to be micro (1 shared CPU) 0.6 Gb memory, f1-micro. Select a region from US regions:
- Oregon:
us-west1 - Iowa:
us-central1 - South Carolina:
us-east1
- Oregon:
- Select a container optimized image for your VM. Click Change button in Boot disk panel and select one of the stable container optimized images. At the moment of writing this article, it was Container-Optimized OS 74-11895.86.0 stable.
- Since the VM you are about to create has to have access to Firesore API, you need to give it such permission explicitly. Click Set access for each API, click the dropdown for Cloud Datastore, and then click Enabled to grant access to Cloud Datastore.
- Click the Create button to create the instance and wait until the instance gets fully provisioned.
- Now everything is ready for starting an instance of Spybot in the provisioned VM. Open an SSH console by clicking on SSH button corresponding to the created VM and start the bot as a Docker container.
docker run -d --restart unless-stopped -e BOT_TOKEN=[bot user token] moikot/slack-spy-bot
Now you should see that Spybot’s status has changed to active too.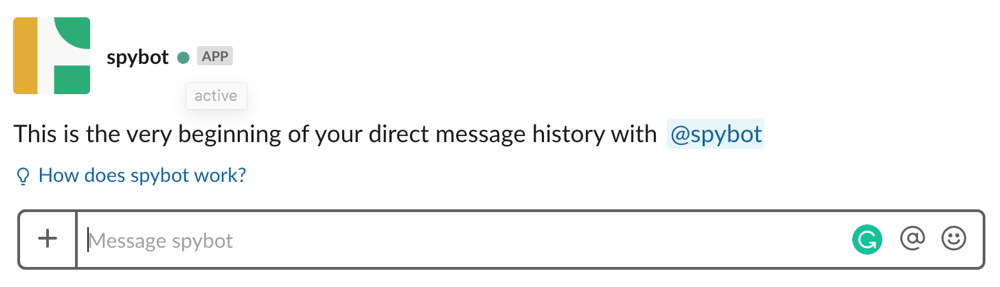
Spying
Before you start spying, make sure that you enabled notifications for all the messages in the channel used by Spybot.
- Invite Spybot and Nilbot to the channel by issuing /invite @spybot and /invite @nilbot commands.
- To start spying on Nilbot send spy-on @nilbot message. Spybot should reply with User: @nilbot Presence: active.
- To stop spying on Nilbot send spy-off @nilbot message. Spybot should reply with Stopped spying on: @nilbot.
- Should @nilbot go off-line, Spybot will send notification User: @nilbot Presence: away.
Note: Currently, Spybot sends notifications only to the last channel used for issuing spy-on command. If you invite Spybot to another channel sending spy-on command for the same user from there, the original channel will stop receiving notifications from Spybot.
All the code is available on GitHub: slack-nil-bot, slack-spy-bot and helm-charts.